| Please note that this article is over 10 years old and we build
scooters a little differently now In particular, most scooters use mountain bike components and 26" wheels, and are fitted with either V-brakes or disc brakes. Seats are now rare, but front suspension forks are common. |
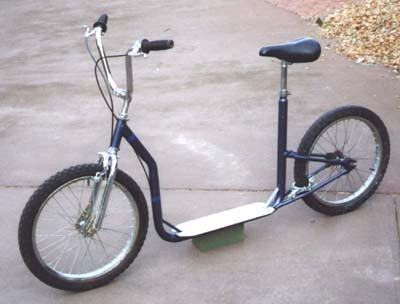
Build Your Own |
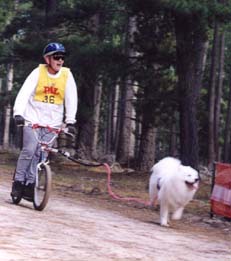
There probably wouldn't be too many Australian owners of Samoyeds and other Northern breeds who, at some time, would not have wondered what it would be like to hitch up the team and head off for a sled ride in the snow. The excited yapping of the dogs, the chill wind blowing through your hair, the almost eerie silence as the dogs settle down, broken only by the rush of sled runners on snow, the sheer joy on the dogs' faces - well, what you see is not actually their faces, but you know they're happy anyway. Then you wake up and realise that there aren't too many opportunities to fulfil your fantasy. The typical Aussie sled dog rarely sees snow - in most places where snow is accessible, dogs are banned, and in any case, it's a day or two's travel for most of us. On top of that, not many of us could even hope to put together a team of a dozen dogs - not even half a dozen - most people's realistic limit in Australia is one or two! So when the sport of mushing got off the ground in Oz, it happened in a typically unique and resourceful manner - one and two dog races using lightweight wheeled "sleds" - scooters and converted bikes! Even now, several years down the track, one and two dog classes are still far and away the most popular, and the Aussie scooter is the most popular racing machine. While it's possible to buy scooters from your local bike shop or department store, the cheaper ones have fairly small wheels and a good one will cost you a packet!
 Construction
of the basic scooter
Construction
of the basic scooter
There are many variations to the racing scooter, depending on the raw materials available and the preferences and skills of the builder. These instructions cover the basic design using a fairly standard BMX bike fitted with calliper (sidepull) brakes. However, I recommend that you consider the advantages of using mountain bike components - see later.
You will need:

The BMX Bike: Start by stripping the brake components from the bike, remove the chain (boltcutters work well), wheels, seat and seat post, handlebar and headstem. It will be easier to cut the frame if you remove the pedals and cranks (the chain sprocket gets in the way). Cut the BMX frame as shown in the diagram. On the seat tube, make sure you don't cut the crossbar and the seat stays too close. Grind down the crossbar and seat stay stumps so that the bike's seat tube just slides into the seat tube on the scooter frame (a tight fit is ideal). On the head tube, grind down the cross bar and down tube stumps until flush.
 Frame:
A length of steel tube is bent to the shape shown in the diagram at the left to
form the scooter's frame. Residents of South Australia can purchase a ready-made
frame from the Samoyed Club of SA
for a nominal price. If a trip to Adelaide is out of
the question, and you don't have access to a pipe bender, talk to your local engineering
workshop or motor exhaust specialist. The bottom corners of the frame will need to be
reinforced. Cut two struts, approx. 13 cm long, and shape the ends to fit across the two
corners at a 45ş angle. Material can be 12 x 12 x 3 mm steel angle (corner facing up) or
20 x 4 mm flat steel bar (face vertical) - whatever is readily available and looks strong
enough. Weld into place.
Frame:
A length of steel tube is bent to the shape shown in the diagram at the left to
form the scooter's frame. Residents of South Australia can purchase a ready-made
frame from the Samoyed Club of SA
for a nominal price. If a trip to Adelaide is out of
the question, and you don't have access to a pipe bender, talk to your local engineering
workshop or motor exhaust specialist. The bottom corners of the frame will need to be
reinforced. Cut two struts, approx. 13 cm long, and shape the ends to fit across the two
corners at a 45ş angle. Material can be 12 x 12 x 3 mm steel angle (corner facing up) or
20 x 4 mm flat steel bar (face vertical) - whatever is readily available and looks strong
enough. Weld into place.
 Footplate: There are many variations, but the
simplest footplate is probably a piece of aluminium treadplate, approx. 475 x 130 mm by
about 2˝ to 3 mm thick, supported by two brackets. A wider footplate will give more foot
room but will increase the likelihood of ankle injuries. Bracket material is 25 x 25 x 3
mm steel angle, 100 mm long (30 mm less than the footplate width). Cut a notch 38 mm wide
(to span the bottom tube of the frame) in the centre of one side of each bracket, and
grind off the bottom corners as shown in the diagram above. Make the notch corners square
so that a brake cable can be run through the gap between the bracket and the frame. For
extra strength, two pieces of 12 x 12 x 3 angle, about 300 mm long, can be welded to the
two brackets, as shown (this is highly recommended). The finished assembly should just fit
between the two corner struts on the scooter frame.
Footplate: There are many variations, but the
simplest footplate is probably a piece of aluminium treadplate, approx. 475 x 130 mm by
about 2˝ to 3 mm thick, supported by two brackets. A wider footplate will give more foot
room but will increase the likelihood of ankle injuries. Bracket material is 25 x 25 x 3
mm steel angle, 100 mm long (30 mm less than the footplate width). Cut a notch 38 mm wide
(to span the bottom tube of the frame) in the centre of one side of each bracket, and
grind off the bottom corners as shown in the diagram above. Make the notch corners square
so that a brake cable can be run through the gap between the bracket and the frame. For
extra strength, two pieces of 12 x 12 x 3 angle, about 300 mm long, can be welded to the
two brackets, as shown (this is highly recommended). The finished assembly should just fit
between the two corner struts on the scooter frame. 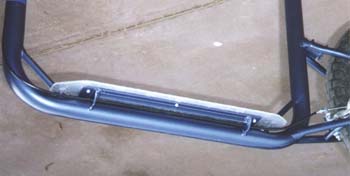
 Weld the assembly
to the frame, ensuring that the footplate will be horizontal. Cut the aluminium treadplate
to size. Taper the front and round the corners as shown in the diagram to minimise risk of
ankle injury. Cut two slots as shown to clear the reinforcing struts. Drill holes as
required to allow the footplate to be bolted to the support frame.
Weld the assembly
to the frame, ensuring that the footplate will be horizontal. Cut the aluminium treadplate
to size. Taper the front and round the corners as shown in the diagram to minimise risk of
ankle injury. Cut two slots as shown to clear the reinforcing struts. Drill holes as
required to allow the footplate to be bolted to the support frame.
Rear Triangle: The rear assembly should be inverted
ie. the BMX seat stays become the lower stays and the chain stays become the upper stays.
This allows the brake callipers to be mounted above the lower stays and ensures that the
dropouts (axle slots) are not pointing upwards (see the diagram). The lower stays should
be attached to the frame as low as possible for maximum strength and for minimum brake
cable length. Cut the stays to length, and shape or bend the ends so that when they are
attached and the wheel is fitted, the desired ground clearance is achieved. 
 Make sure that the wheel aligns with the plane of the scooter frame
and that there is adequate clearance between the tyre and the seat tube (nominally 5 cm).
Also, make sure that there is a smooth path for the brake cable. It would be advisable to
cut off a little at a time and "creep up" on the final stay lengths - it's
easier to cut more off than to put it back on. Ground clearance is nominally 10 cm - a
little lower makes scooting easier, but too low means you'll bottom out more often on
rough tracks - your choice! When satisfied that everything is positioned correctly, weld
the stays to the frame.
Make sure that the wheel aligns with the plane of the scooter frame
and that there is adequate clearance between the tyre and the seat tube (nominally 5 cm).
Also, make sure that there is a smooth path for the brake cable. It would be advisable to
cut off a little at a time and "creep up" on the final stay lengths - it's
easier to cut more off than to put it back on. Ground clearance is nominally 10 cm - a
little lower makes scooting easier, but too low means you'll bottom out more often on
rough tracks - your choice! When satisfied that everything is positioned correctly, weld
the stays to the frame.
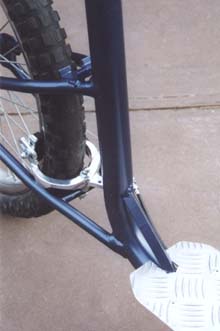
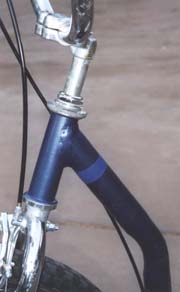 Head Tube: Cut and shape the neck of the frame so that when
the head tube is attached, the following criteria are met: (1) the lay-back angle of the
forks is approximately the same as on the BMX bike (usually 22˝ş), (2) the head tube
aligns with the plane of the frame, (3) the footplate is parallel to the ground (ie. same
ground clearance front and back), and (4) there is adequate clearance between the front
tyre and the frame (nominally 5 cm). Once again, cut off a little at a time. It may
be necessary to adjust the angle of the neck, especially if you cut off too much! When
satisfied, weld the head tube into place
Head Tube: Cut and shape the neck of the frame so that when
the head tube is attached, the following criteria are met: (1) the lay-back angle of the
forks is approximately the same as on the BMX bike (usually 22˝ş), (2) the head tube
aligns with the plane of the frame, (3) the footplate is parallel to the ground (ie. same
ground clearance front and back), and (4) there is adequate clearance between the front
tyre and the frame (nominally 5 cm). Once again, cut off a little at a time. It may
be necessary to adjust the angle of the neck, especially if you cut off too much! When
satisfied, weld the head tube into place
The Seat: Heroes can cut the seat tube just above the upper stays and cap the tube
with a 38 mm diameter steel disc welded into place. Mere mortals will appreciate the
luxury of a seat. Work out a suitable seat height. Set the seat post at about half maximum
extension in the BMX seat tube, and cut the seat tube on the scooter frame so that when
the BMX seat tube is inserted, the seat is at the desired height. The top edges of the
crossbar and seat stay stumps should be level with the top of the scooter frame seat tube.
Remove the seat post and weld the tube into place on these three edges only. Unless
you are an expert welder, any attempt to weld directly to the BMX seat tube will almost
certainly cause distortion which will prevent the seat post from being inserted into the
tube. Fill the gaps with body filler. 
So you used a girl's BMX bike, or for some other reason, the crossbar and the seat stays don't line up! In this case, improvise (or learn to braze) - perhaps leave the seat stay stumps long enough so that the front of the seat tube is jammed tightly against the frame's seat tube. Weld to the stumps only and fill the gaps. Alternatively, use a longer section of the BMX bike's seat tube and cut the seat tube on the frame correspondingly shorter so that the weld does not interfere with the seat post when fully inserted.
 Finishing:
Grind down excessive weld material and use a wire brush and/or wheel to remove flux,
corrosion, dirt, old paint etc. Make sure all welds are sound - re-weld if necessary. Give
the entire frame a coat of rust converter, paying special attention to welds. Follow with
a few coats of rust-inhibiting primer and then a few layers of top coat (sanding lightly
between coats). Assemble all of the components and go racing.
Finishing:
Grind down excessive weld material and use a wire brush and/or wheel to remove flux,
corrosion, dirt, old paint etc. Make sure all welds are sound - re-weld if necessary. Give
the entire frame a coat of rust converter, paying special attention to welds. Follow with
a few coats of rust-inhibiting primer and then a few layers of top coat (sanding lightly
between coats). Assemble all of the components and go racing.
A Word on Brakes: If you need to remove wheels in order to transport your scooter, think about buying new callipers fitted with quick-release mechanisms. The rear calliper brakes will not be very efficient due to stretching of the inner cable and compression of the sheath over a considerable cable length. With some additional welding of fittings and brackets, it should be possible to arrange for part of the cable run to be unsheathed, thus minimising one of the causes of the inefficiency. The penalty is that penetration of water and dirt will now be more likely - can't win 'em all!
Mountain Bike Components: The use of mountain bike components is becoming more popular. Advantages include:
but they're bigger and the scooter will therefore be harder to transport.
If you plan to use a mountain bike, the following points should be noted:
For more info on scooters, check out Daphne Lewis' Dog Scooter Page